
Welcome To Jim’s Tips!
I’m Jim Barr, and jimstips.com is one of my little corners of the Internet, my voice for all things tech. I love riding on the bleeding edge of technology, and I love exploring new gadgets, services, Web sites, programs, and anything interesting! Here you will find all sorts of tips and information about those things that interest me.
Explore Jim’s Tips!
Select Category
Select Sort
Wow, What a Wild Ride!
 Jim Barr
It is now 10 years later, and I sit here typing this very relaxed and unburdened. I just completed a year of serving as the Most Illustrious Grand Master of the Grand Council of Royal…

Machine Embroidery: I caught the bug!
Jim BarrThe Geek finds (another) hobby I’m a geek by hobby and profession with some experience in Web design, image conversion, desktop publishing, electronics, etc. I’ve always had a love for processes that can take a virtual…

Samsung Chromebook Plus Mini Review
Jim BarrThe Samsung Chromebook Plus I purchased a Samsung Chromebook Plus for $309.00 from Rakuten on a Black Friday sale, and after putting it through its paces for a couple days, I am very, very happy…

The Pebble Time Smartwatch
Jim BarrI really like the Pebble Time Black. It provides everything I need in a smartwatch, and the long battery life makes it worth it. Why I Bought It I was having issues with my LG…
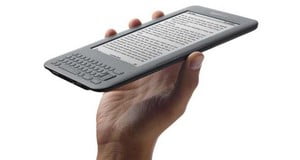
The Kindle 3G+Special Offers edition
Jim BarrI just purchased a Kindle 3G+Special Offers ebook reader, and I have to say that it has far exceeded my expectations. To me, when assessing a device like this, it is always important to put…

Vonage: Revisited and loving it!
Jim BarrIn an earlier post, I moaned about how though Vonage was a great service, it just didn’t fit our needs due to several significant shortcomings. Well times change, and so have my views about Vonage….
CR-48 and eyeOS – a match made in Heaven?
Jim BarrMany years ago, I played around with an “online desktop” site called eyeOS. After playing around with the CR-48, it got me thinking that a virtual, online desktop just might be useful on the CR-48….
CR-48 Important Security Tip
Jim BarrI love the CR-48’s fast bootup, and I absolutely love its instant-on feature: Leave it powered on, close the lid, and when you re-open it, it’s instantly on where you left off. This standby mode…