The Geek finds (another) hobby
I’m a geek by hobby and profession with some experience in Web design, image conversion, desktop publishing, electronics, etc. I’ve always had a love for processes that can take a virtual design on a computer and result in a physical item.
So I looked looking into machine embroidery, and I learned that not only can it produce creative and real tangible things, but it is the process that can really intrugue the tech geek. After all, it’s just another application of hardware and software, that, when analyzed from a technical perspective, doesn’t differ that much from a 3D printer or other similar tools, right?
OMG, it’s a CNC machine!
I was reading an online article about embroidery machines, and at one point it was described as being like a CNC machine for fabric and thread. Oh wow, how cool! I can relate to that!
After investigating further, I found that the hoop (the device that holds the fabric) moves around along a pre-determined path while the needle stitches the thread. The end result is a design stitched to the fabric, and it can be very simple or very complex. And unlike a sewing machine, you don’t have to have the dexterity to hold and guide the fabric, or step on a pedal to control the speed–it’s all (pretty much) automatic. Everything is controlled by a stitch file that is just a data file that contains all of the instructions and commands to guide the embroidery machine on how to move the hoop around, how the needle stitches, what colors to use, etc. And how these stitch files are created and edited is what really piqued my interest.
You use various programs to ultimately generate the stitch files, and elements of graphic design, font selection, image editing, etc. all come together with machine embroidery.
So, what to buy?
OK, so now I need to see what’s out there for the hobbyist who wants to tinker with machine embroidery.
First off, understand that there are many tiers of complexity, function, and cost. And these range from inexpensive hobbyist machines for a couple hundred dollars several hundred dollars, to commercial-grade multi-needle, multi-head machines that can run literally tens of thousands of dollars. And speaking of needles, you need to accept that unless you have several thousands of dollars to spend, you absolutely will be purchasing a machine with one needle. And that means stitching one color at-a-time. And that requires thread changes on multi-color projects. Money is the absolute determining factor on this point, and there’s simply no way around it. And after stitching a few multi-color projects, it’s really not a big deal.
While I would love one of those amazing high-end machines, the reality is that I can’t (and don’t want to) afford to spend a ton of money. I don’t plan on going into the embroidery business (yet?!?) so I did a lot of research on introductory, consumer-grade embroidery machines.
Specifically, I looked at features, design, price, and reviews. I checked the obvious places such as Amazon, and then Googled various things to find articles and professional reviews.
TIP: If you shop Amazon, when looking at reviews, filter on “Verified purchases”. This ensures that the reviews are from people who actually purchased the item, increasing the chances for honest reviews.
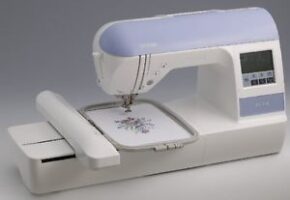
After some analysis paralysis, I purchased a Brother PE770 Embroidery Machine:
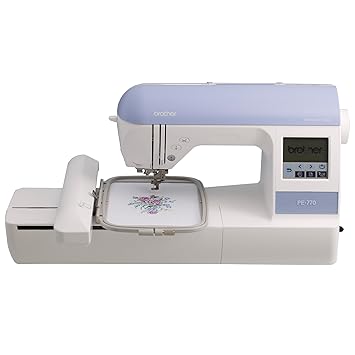
The PE770 model has all the features I needed to get started, and it’s reasonably priced at under $600. As far as introductory consumer-grade models go, the PE770 is mid-range in price. I did look at its cousin, the Brother SE400, which sells for just over half the price, and many reviews show it to be a solid and very affordable machine. I almost bought it, but a couple features of the PE770 stood out that pushed me to the higher-priced model. For example, the PE770 has a larger work area of 5″x7″ compared 4″x4″ on the SE400. I have no idea how large I need, so I figured, let’s go bigger!. And the PE770 accepts USB flash drives to transfer files, whereas the SE400 requires a USB connection to a computer. My computer was originally not in the same room, so that presented a problem. I also read many excellent reviews of the PE770, so I knew that either would be a good choice.
Oh yea, software
All right, I have the machine! So now what? As I said above, an embroidery machine need a design file to stitch. But where do you get them, and what can you do with them? There are three general ways to get stitch files:
- Use the pre-designed patterns built into the embroidery machine. While these designs look great, you are limited. But it’s a great way to start and get a feel for the machine!
- Purchase pre-designed patterns online. The idea is that you purchase the files, download them, and then transfer them to your embroidery machine. Like anything online, there are countless sources for designs, so start with Google. As-is, these designs can often provide exactly what you need. But you may want to alter them or add to them, so in this case you will need an editor program.
- Create your own stitch files from your own designs. This obviously takes the most time, the most creativity, and in the end, can be the most costly (due to the required software) but you can end up a completely custom design that you can call your own.
Obviously, each option is progressively harder and more costly, but the end results are well worth it, particularly depending on your needs. Want to just stitch off a monogram? This may be a very simple process with the in-built designs and lettering. But if you want to stitch a company logo with custom lettering, then the game changes.
I’m not going to name a bunch of options here, primarily since I don’t want to be negative about any particular company or offering. There are many options, and your needs will vary from mine. Suffice it to say, Google is your friend.
TIP: If you are on Facebook, search for Groups related to the machine you purchased and inquire there about software. Each software company often has associated groups as well, and these are probably your number one resource, since you are dealing with people who actually use the product. I’ve gleaned amazing information and insights from these dedicated souls!
What kind of software do I need?
From what I have found, the capabilities of the various software offerings (with very few exceptions) are directly related to their costs. Full-featured, comprehensive, commercial-grade software can run many thousands dollars, so for my needs (and most hobbyists) that’s out of the question. So we need to lower the bar quite a bit.
I’m finding several general classes of software, each targeted at specific users or functions. You generally won’t find many all-in-one, all-encompassing offerings because they tend to either fall short in their individual components, or they are very pricey. Many consumer-friendly companies offer either separate products to fill specific needs, or separate “modules” that tie into and extend a moderately-priced base product. The level of integration across several products also vary greatly.
If you think of the computer graphics world, you see a similar trend. Sure, you can buy the full Adobe Creative Suite, but some people only need something like Photoshop, while others need Photoshop, Adobe Illustrator, and InDesign to get the job done. So it goes in the machine embroidery software world. I’m finding several kinds of software: digitizing, editing, and transforming programs. Let’s look at each:
Digitizing
Digitizing software takes an image file (such as a JPG image) and converts it into a stitch file that can be either sent directly to the embroidery machine, or loaded into an editor program for further tweaking. The end result can only be as good as the input, so digitizing software often provides features to improve the image for digitizing such as reducing colors. Digitizing capabilities can be found in stand-alone programs as well as integrated into editors.
TIP: A graphic editor is a very useful tool to tweak the image file prior to loading it into the digitizing software. Resizing, correcting or reducing colors, and other transformations are often more suited to image editors. Photoshop and the much lesser expensive PhotoFiltre-Studio are excellent commercial choices. Open source options like Gimp and InkScape (for vector images) are invaluable, and they are free.
Editing
Editing software comes in many flavors, but the basic function is to allow you to edit specific stitches within a stitch file. Digitizing software can sometimes present anomalies in the stitches requiring manual fixing. Editing can include adding stitches, moving stitches around, and deleting stitches. Many editors let you merge multiple stitch files into a single stitch file (for example a lettering file merged with a logo file) saving time. Other functions can include resizing the image, altering thread colors and brands, and a host of other functions. Stitch editing can be very time consuming and tedious, but it is sometimes necessary, especially for customized work.
Transformation
Transformation software often lets you convert the stitch file from one format to another, resizing the design, rotating, flipping, and moving the design, and other basic functions.
All of these kinds of programs can come separate, or combined in many ways depending on the company. Some are more integrated than others, and some from different companies may serve you better. For example, purchasing a digitizing program from one company may be more useful to you than the digitizing program offered by the company that makes the edior software that you like. Find the right tools for the right job.
TIP: Most companies offer multi-day trials, or demo versions. The scope can vary, though. Some demos and trials are full-featured, some have limits, some let you save your creations, and some do not. The point is not to provide you with a bunch of free tools, but to give you a feel for what the programs can and can’t do. Take the time to try a few demos or trials, and put them through their paces.
So what did I end up buying?
I opted for several programs from S & S Computing (sandscomputing.com) due to their decent set of features at very affordable prices (compared to similar offerings.) Be aware that “affordable” is very subjective. After a ton of research, I concluded that S & S Computing’s offerings were the best fit for me at this time. While these are not high-end programs, they certainly provide a nice basic set of end-to-end tools that will enable you to go from an image to stitching. Here’s the breakdown:
SewArt
$75.00
“SewArt (SA) is an embroidery digitizer for converting raster image files (*.jpg/*.png, etc), vector images (*.svg, *.emf), and clipart into embroidery file formats. Image processing tools and a step-by-step wizard are provided to produce an image suitable for yielding a high-quality embroidery stitch-out.”
Now while this sounds amazing (and it really is) in practicality it has some limitations. It does a very good job of “stitching” an image, however you will almost always need to tweak the image with an editor like SewWhat Pro (below.) At this price point, don’t expect pristine, drag-and-drop function, but you can expect decent quality. The end results really depend on the source image. The simpler the design, and the less colors go a long way to making a nice pattern.
SewWhat Pro
$65.00

“SewWhat-Pro (SWP) is software for viewing, editing and converting embroidery files for various different sewing manufacturers. It includes various Integrated Project Management features (see the description of SewWhat-Pro features below).”
The power of this program comes in its flexibility in being able to not only edit designs (made from SewArt or purchased online) but to merge files together. For example, if you want to add lettering to a logo, it’s a simple matter of just merging to lettering file into a logo file. It also has editing features to edit individual stitches to clean up or improve rough designs. It will also let you resize, rotate, and otherwise transform many aspects of the design.
SewWrite
$40.00

“SewWrite (SWR) is software for creating and arranging high-quality lettering for embroidery files. It uses hand-digitized alphabets based on Windows fonts for greater quality and ships with a wide range of typefaces. User requests for additional alphabets will be considered. SewWrite ships with over 70 alphabets and four symbol/dingbat alphabets.”
The idea here is that while SewWhat Pro does let you type in text to stitch, the fonts it uses are native Windows fonts that get converted on-the-fly, so the end result can be rough and uneven. SewWrite compliments this by providing pre-designed letters that stitch out quite well. It also lets you tweak the size and layout (such as arcs) making the final product very customizable.
SewIconz
$25.00

“SewIconz is software for viewing the contents of embroidery files, quilting files, and certain common image files as icons from within Windows File Explorer© or from the File->Open dialog of embroidery software. With SewIconz, the stitch pattern contained in embroidery files and some cross-stitch files will appear as icons as you scroll through your Windows folders. Information about the number of stitches, colors and pattern size (in either mm. or in.) will appear as your cursor moves over the icons.”
At first, I thought this was really just a convenience, but I’m finding it to be absolutely essential. Just like image files, you can quickly and easily tell the contents of stitch files without having to open them, making organizing a snap.
I hate to reiterate this, but these are not high-end applications, and you will find more depth in more expensive applications. But for my needs at this time, this seems like the perfect choice. The reality is that even with high-end programs, you will definitely have to tweak designs to get them just right. Don’t expect this to be a simple drag-and-drop exercise. It takes patience, creativity, and patience.
And then there are the accessories
In addition to the hardware and software, you will need lots of other goodies that you may not think of, or may not even know about:
- Thread
- Bobbins
- Stabilizer
- Spray adhesive
- Good scissors with micro tips
- Additional hoops
- Patience…lots of patience
These additional items can be costly, but they are necessary. Again, check out Facebook Groups or the like to find personal recommendations and tips. I’m amazed by how this relatively solo undertaking has become such a social (online, anyway) hobby!
More coming soon
I’m working on reviews of the PE770, and each of the S & S Computing programs. My goal is to provide my (very limited) insights on how they work, how they perform, and to provide tips on how to use them better.